Saturday 24 December 2011

Christmas Gifts, Greetings, and Gorgeousness!

Hey!
Just popping in to say Merry Christmas! to you all!
I can't believe it's Christmas Eve! Time has flown! I've been very busy lately, but it's paid off  because all my gifts and cards are FINALLY made, wrapped, bought, glittered, enveloped, signed, tagged, photographed ;) and are sitting under a sparkling tree ready for tomorrow! I have NEVER been this organised, so I'm quite proud of myself!  If you've still got to make gifts and are completely panicking, here's a few
ideas:

Head on over to Creature Comforts for:
10 Last Minute Diy Gift Ideas!   
 There's some great ideas here that you could whip up today if you get cracking!    


You could give the gift of ornaments! Here's a link  for a round-up of last-minute ornament ideas!  


Another round-up of last-minute gift ideas here! Not as stylish as the creature comforts one, but there are some cute ideas.


How about giving a semi-homemade gift to save on time, but not sentimental value?  For example, spruce up an old notebook (or new cheap one!) with:

- A little fabric message or name of the recipient,

- Pretty Vintage Fabric (see top right),

- Fun Foam Stamps, or...

- Washi tape (Isn't this one just gorgeous!)


If you (amazingly) have lots of time on your hands, trawl through check out ;) One Pretty Thing's Handmade Gift Guide, a ginormous collection of gifts you can make, in every size, shape, and colour. Some are better than others. Like I said, there may be a bit of trawling involved!

And finally on the gifts front, something entitled "Little or No Skill Required Holiday Gifts" Sounds good to me! Now where did I put the chalkboard paint?!


And of course, don't forget the wrapping! Have the best looking gifts under the tree with these two links full of pretty ideas:

And if you really just want to be swamped by gorgeous wrapping ideas, check out my Pinterest board dedicated to just that! I've pinned tags, toppers, twist ties and more here! You'll find free printables, diy ideas, and just plain eye candy! Some presents here look too great to ever unwrap.
 I hope this helps!
Merry Christmas, I'll see you (hopefully!) in the New Year!  S xx

Sunday 27 November 2011

Christmas E-zine Round-up!

Hey!

So I'm SUPER happy lately.Why? I won this giveaway, that's why! Sparkle Mod-Podge, paints and brushes! Woooh! Now I just have to decide what to make!

This, perhaps? Very festive! 

Speaking of festive, there's a lot of Holiday e-zines out now that are really good! Emily Henderson's is, of course, fabulous, full of gift ideas and great diys! You can check it out here.

Don't be fooled by the child-like felt snowmen on the cover of Tickle the Imagination - this is a stylish, and beautifully well-put-together magazine, full of gorgeous crafts for your home and others!


Another one worth a browse is Splendidly Homemade. There's some good gift ideas here. I especially love the Yo-yo embellished gloves and socks! Very cute!

Creature Comforts is one of my favourite blogs, so it's no surprise that Ez comes up trumps with her wonderful publications of Gifted magazine. Last year's is full of free printables and diys. This years is simply full of wonderful presents to get for others. Put aside plenty of time for both - you'll be enthralled!

All of the above mags are FREE! Yay! But if you're willing to spend a little bit on an online publication, Amy Power's  Inspired Ideas is for you! All the issues are just so wonderful to look at and sigh with crafty happiness!

So there you go. My round-up of must-see Christmas e-zines. have I left something crucial out? Please don't hesitate to tell me! What is your favourite magazine to read during the festive season? Leave a comment - Don't be shy!
S xx


Thursday 3 November 2011

Pretty Pinterest!

Hey!
So I haven't posted in aaages, but lets not talk about that and instead, let's admire the new shiny Blogger look! What do ya think?! Pretty fancy, no?
So I've been kinda addicted to Pinterest of late, (no change there!) and have found some super pretty things over there! So here we go, my latest round-up of Pretty Pinterest!

1) I orginally found a picture of this a while ago, but I happened upon the actual link via Pinterest. It is going on my Christmas list NOW! It is Deborah Lippmann Glitter Nail Color! (A.K.A. PARTY ON YOUR NAILS!) It looks so fun and glittery - I want it sooo bad! :)  

2) Next, I found this gorgeous online magazine called "Etzcetra" The first issue is so cute, filled with lots of crafty little things to make and do. Also, as it's the first "pilot" issue, it's FREE! Yay! Who doesn't love free cuteness? Crazy people, that's who! Check it out here!

3) Do you like penguins? Do you like paperclips? (Clearly those are rhetorical questions, I mean seriously, Who doesn't?!) Well, now you can combine your two great loves with these! Yes, ladies and gentlemen, there are now paperclips that are shaped like penguins! WOOH! And if you're too cheap to fork out $7.99 for a box of paperclips, you can try and diy some. This tutorial shows how. Just substitute mustaches for penguins. (That has got to be the weirdest sentence I have ever written)

4) Next, I found these! Sick of the paparazzi following you around and taking photos of you in embarrassing situations? (Hey, we've all been there.) Then you need these! (This post is sounding more and more like an overly cheesy ad as it goes on. I apologise.) Anyway, these are "censored" shades and look so cool! Is it weird that I really want a pair?!

5) And finally, I found this supermegafoxyawesomehot (A Very Potter Musical inside joke. If you're a hp fan and haven't seen it, getcha self over there FAST!) blog called Colour me Katie. Seriously, put aside some time to go through the archives of her posts. She lives up to her name and her apartment is filled with the cutest paper cut-outs in the colours of the rainbow - Mucho inspiring! She also posts about Improv Everywhere, a "New York City-based prank collective that causes scenes of chaos and joy in public places." Like I said, really inspiring and funny! You can't help but smile at Katie's wonderful posts abut her cat, creatively fixing problems, things that make her happy, and crazy costumes!  That's all for now! Byee! S xx

Friday 7 October 2011

Make a Gift Bag!

Hi! How many times is it actually acceptable for me to apologise for not posting?! It's getting so repetitive, there's just no point any more. I'll stop. OK once more, Sorry!!!

Anyway, did you know, it's only
78 Days,
8 Hours, and
56 Minutes 'til Christmas?! That's less than 11 weeks away, and if like me, you're planning on making all your cards, and gifts, it's time to get cracking! (If the prospect of this freaks you out, or you are one of the people who hates people who talk about Christmas before Halloween, bear with me! I may turn this into a bit of a "Preparing for Christmas" feature, but I'm super busy right now, so no promises!)

You could also make this little gift for any Autumn/Winter Birthdays! I made this little bag for my cousin's birthday a while ago.

I  followed Angry Chicken's fab tutorial for snack bags - I know, but they work great as any sort of bag! And it is SO easy! I don't have a sewing machine and am a complete novice when it comes to any type of sewing at all, but I did this in literally 10 minutes!
The monogram took a good bit longer. I opened Microsoft Word, and then played around with lots of different fonts till I found a nice chunky "E"! I printed it off big-ish (Don't you love my precise instructions!?) I then pinned it to a nice coordinating felt, and cut it out. Sewing by hand around the corners was a bit tricky, but I managed it!) Et voilà! A lovely little bag! I filled it with some stickers, a mini notebook, pen, and some little toys! And you have a great personalized gift! It would work for boys too , maybe in red, navy, or green, and a monster, robot, >> etc. sewn on?! Any simple silhouette would work great! That's all for now! S xx


Saturday 24 September 2011

My version! 
Hey!
So I haven't posted in ages - I know, I'm sorry, but I have been SO BUSY!  I'll post whenever I can get a spare moment!

Anyway, I found this fab tag tutorial on Saltwater Kids (via Pinterest, of course.) I saw it and decided I needed to try it!

I've become completely addicted to Pinterest lately (as if that wasn't already SO obvious!) BUT I don't actually try any of the things I pin! I've done a few, but I currently have 3239 pins, so I think I'm slightly behind. This is me trying to rectify that.

Since I already have a Picnik account (again, evident from previous posts!) this was a piece of cake! I can't believe I never thought to try it before! >> This was my first attempt - WAYY too big when I printed them off - Go smaller than you think! - but now I know how to do it, my mind is buzzing with ideas - Christmas ones? teeny-tiny ones?  How about "Made with Love" ones??

 Saltwater Kids version!
 If you want to try making your own tags, check out the tut here! Much cheaper than store-bought ones - They're pretty much FREE, in fact, and you can personalise them with names, special occasions, anything! I'm thinking New Baby ones would be adorable, with the name and date of birth of the child!  That's all for now folks, Byeee! S xx

Saturday 3 September 2011

Sorry! (And Good News!)

OK, I've been completely MIA lately. I haven't posted in ages! I'm sorry, and I know there's no excuse, but I'm going to make up one anyway! It's September, so I'm back in school again, and it's just realllly hard to get a post finished! I'll do my best, but no promises! ;) You can check out my Pinterest boards if you get withdrawal symptoms! Somehow, I always find a spare few seconds to pin one or two lovely things!
In other news, I've just found out that my comments OK, comment, :) will we featured in the September/October issue of House and Home, a great Irish home and interior magazine! I commented a while back on a room on their website. As I am ever-so-slightly opinionated, it came quite easily to me! Imagine my shock when I checked out the digital preview of the mag, and there was my name! It's not a huge piece, just a little snippet, on Page 13, but made me so giddy! :) I can't wait for the issue to come out - not just because of my comment, (!) but because they have what looks like it'll be a great feature on Design*Sponge, one of my all-time favourite websites for decorating and DIY Projects! I actually buy it anyway - so no sponsoring here, just excited-ness on my part! If you don't live in Ireland, I'm afraid I don't know if you can get it, but you can browse their cool website! Click on preview in the top right-hand corner! Until then BYE!

Wednesday 24 August 2011

Picnik!

Hi!
I have been messing about on Picnik, which is now my new obsession -
  • It's free, 
  • You don't have to download ANYTHING, and...
  • You can alter your photos, play with them, add fun stickers and shapes, allll kinds of stuff! It's so much fun! 
Here's >> my first photo attempt! - not the most prettiest pic ever, but I think good for a first try! Of course, it's still sideways. In Picnik it was the right way round, so maybe Blogger just doesn't like me. I'll (hopefully) post again with better attempts, but I wanted to show this to you first!
 Ladies and gentlemen, If you'd just like to squint and crank your neck to the side, you will see my efforts! :P That tiny writing right there is ze blog name. I've seen tonnes of photos on blogs with a kind of "watermark" on them, saying the blog owner's name, the name of the blog, etc. I always thought you needed a super-fancy-schmancy photo-editing program to do it, or that it was really hard, but actually, it's not! It's so simple!
Just click "Add Text", type in your blog address, choose the font, and the colour and the size, and position it where you want it. BOOM! Your own customized watermark!
At the top is another pic I altered. My "workspace" has actually changed a LOT since I took this photo, but there it is! I rounded the corners, "matted" it, and added text and an arrow! It's so easy!
I also think it would be a great idea to take a picture of, say your kid,  and add text to it to use as a party invitation! Try it out here!  (And NO, this post was NOT sponsored by Picnik, this is just what I think about their awesome website! ;)
 
*Update*
I wasn't lying yesterday when I said I was making word art after reading Centsational Girl's tutorial! Here << is my first shot. What do you think?! I loved the quote, so I typed it up, played around with some of the awesome fonts they have, et Voila! This version is just black and white, but I will definitely be exploring different colours soon! (And if you like it, feel free to right-click on it and open it in a new tab, nice and big, ready to print off! I'd be flattered!)  S xx

Tuesday 23 August 2011

Making DIY Word Art!

Hi!
Sorry for the lack of posts of late, I should be back with a Cardmaking on the Cheap post in the next few days, but today, I'm trying this. Making my own word art! I've done very basic stuff in Microsoft Word (don't judge!) but was thinkinhg of doing something a bit more "advanced" with Picasa or Piknik, and today, via Pinterest (Of course!!!)  I found a tutorial to do just that! I've pinned so many awesome quotes on Pinterest, the difficult part will be picking which one to do! Hmm, maybe I'll have to do a few!

AND I might try out some Lego jewellery! Hey, my brothers have wayyy to much, anyway! ;) I'm thinking rings, too! What will YOU be doing this Tuesday?! S xx

Thursday 18 August 2011

Pretty Pinterest!

Hi!
If you haven't hear of Pinterest yet, WHAT THE HECKITY HOOLAH ARE YOU DOING?! (According to Spellcheck, "Heckity" and "Hoolah" are not real words, but I don't care.)
*cue explanation* Pinterest lets you organize and share all the beautiful things you find on the web. People use pinboards to plan their weddings, decorate their homes, organize their favorite recipes, and keep DIY and craft projects together!
Best of all, you can browse pinboards created by other people. Browsing pinboards is a fun way to discover new things and get inspiration from people who share your interests. To get started,you have to request an invite. Mine came a couple of days later. If you don't like waiting, (Who does?!) leave your e-mail below and I'll send one your way! If you already have an account, feel free to leave your username below and I'll follow you! My boards are here.

Anyway, on with the post! I find so many great things on Pinterest, my boards are over-flowing, and I never get around to looking at them! So, I'm going to make an effort to have a post (hopefully once a week) where I share some of the awesome things I find on Pinterest. This may help me to actually make some of the DIY projects, visit some of the websites, print some of the printables, etc., or it may just become another form of procrastination. ;) Let's go with the first. On with the show!!! (Pretty Pinterest isn't a very good name, I know. I'm not good at naming things, OK? I fear the day I have to name a child and end up with a little boy called Fido. If you can think of something better, let me know!)

For my first round-up we have a completely random collection of things, 'cos that's just how I role.
  • Up first, How to win at Rock Paper Scissors EVERY TIME. This needs no explanation. RPS is often used to settle arguments.Therefore this helps you win arguments. Therefore this is awesome.(Yes I did just explain it, SSSHHHH!)
  • This is such a cool idea! Run crayons through a glue gun onto canvas to make awesome DIY art. I'm prettty sure it would WRECK the glue gun though, so I wouldn't do it with mine! Maybe if I had a really cheap gun? There's no tutorial for this, only the picture, but it seems easy enough. There is a tut using a hairdryer, though, which wouldn't wreck your gun. Find it here.
  • Next up, Make a heart shape egg without a mould or anything! This is SO cute I can't even stand it. And I don't even like eggs. Picture directions here.
  • I found Brassy Apple's tutorials via Pinterest. (There are loads, check them out!) One of my favourites has got to be this DIY Angry Birds game!!! My youngest brother is obsessed with the viral app, so this would be a must for him! It's a real life version! :D
  • OK, the next one I didn't originally find on Pinterest. Here's the story...  I had seen it while blog-hopping, and LOVED it, but then lost the link (Smart, right?!) A couple of days later I was merrily pinning away when I - Guess What?! - REFOUND it! Aaah, what a lovely tale! It would bring a tear to your eye. Oh, "it", by the way, is a Sheet Music/ Book Page Feathers tutorial! Great for gift-wrapping, home decor, cards, anything!
  • You've probably noticed from the less-than-wonderful photos here on my blog, that I am NOT a natural-born photographer. However, I am hoping to change my ways and properly learn how to use the old camera of mine! I've - yep! You guessed it! - started a pinboard to help me. So far there's not much on it, but I'm hoping to find good tutorials, tips, and inspiring photographs, that will take me (hopefully) a step further than pointing, shooting and hoping for all my life that whatever I'm taking a photo of is in flippin' focus. 
I've found a number of 30-day photo challenges, where you follow the list to take picture of something every day for a month. I started today, and spend a rather unsuccessful 45 minutes trying to take a photo of myself that wasn't....
a) out of focus
b) of my leg/arm/knee 
c) way too bright or..
d) way too dark.
Oh well, here's hoping I improve over the month. You can check out my photography board here, but for now, here's >> a cleverly-taken photo.  Can you guess how it's done? The couple are simply at the bottom of a staicase, lying on the ground! Smart, eh? This was taken as an engaegment photo, but I think it would just be fun to do any day!

  • One last thing for my your Thursday enjoyment...  ;) I just love this. (LOooong break coming up! Watch Out!) ;) I don't know why.  Maybe because it's funny, or because it really does inspire me. Maybe because the person who wrote this likes to makes lists, and lots of them, like me!! But I think mostly because, bar one or two things, it sounds exactly like I wrote it! It's just so.... ME!! :) And that's your lot folks. Have a Thursday that is entirely YOU! S xx

Sunday 14 August 2011

Creativity Journal/DIY Smash Book!

Hey!
So a while back, in my Inspired Ideas post, I mentioned starting a "Creativity Journal" using some of the cute projects from the magazines. And I figured the best way to get the ball rolling was to make a Pinterest board dedicated to it, of course. Really, it is THE best way to keep ideas, projects, etc., together. At first I wasn't really sure what route to go with. I didn't really want one of those "art journals" that pros have, with amazing watercolours and the like, because I'm just not that talented! I did know that I wanted to include the Inspired ideas projects, and then I came across this. (via this great Counterfeit Kit Page - They cover everything, I've just found a few extra DIYs!)

It's called a SMASH book. And I want one. Basically it's like a scrapbook, but for the lazy busy, ;) but still creative people who don't have time to create amazing scrapbook pages, but still like to gather memorabilia, photos, notes, etc. Sound like you? You can just SMASH in whatever you feel like, little doodles and notes, cards and pictures, thoughts... little things that make you smile. SMASH books are so cool that they completely sold out in like 5 seconds. (Well, maybe not, but you know what I mean!)

But wait! All is not lost! there are literally MILLIONS of DIY versions out there, all made basically in the same way. Get some nice sheets of patterned paper, and two heavy card stock pieces for the covers, and bind it all together! Cheaper than the real thing, and completely personalise - able (!?!) , as you can stick in your favourite patterned papers!

Of course, the real beauty of SMASH books is what's inside them. Yeah, you can buy alll sorts of SMASH  accessories that are really awesome, but why not make some yourself?!
Instead of buying their paper pockets, you could  fold some yourself, using a printable template. 
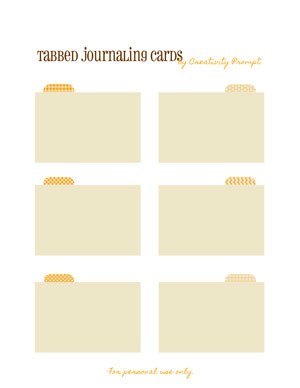
Oh look, I found one! ;) Instead of using their journalling tabs and stickers, why not print off FREE! :) pretty ones here? There's soooo many! Big ones, small ones, blue ones, pink ones, super-cute tabbed ones! 
There's a little kit you can buy that has tissue paper and paperclips, for you to make little flags.Come on, you're not gonna let them get away with that, are you!? SO easy to DIY! (I actually think they're prettier with fabric scraps!) And why stop there?! Get creative and make these bow paperclips if you want a pretty, girly journal!


 I've decided to combine both the SMASH book idea and the Inspired Ideas projects into my journal. It's tabbed, so one section will be for randomly "Smashing" stuff in, another section will be for the Inspired Ideas projects, and another will be for writing down notes, projects and ideas. You could do it this way too! If you can't find a tabbed journal, MAKE ONE! :)

Think about adding "texture" to your journal. Don't just use paper all the time! Add some 
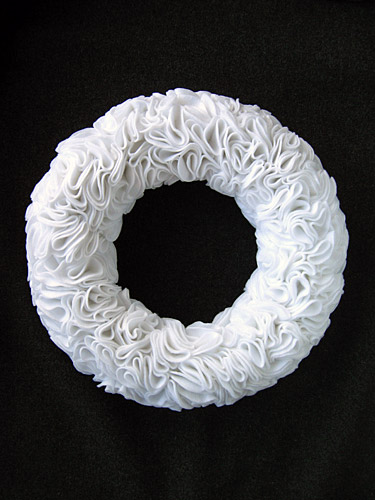
mini felt bunting across the top of a page (too cute for words!) or some glittery tape to sparkle things up! Have fun with it!

These freee printable tabs look just like the real thing! Add in some lists like this, some of the great journalling techniques here (if you're going down more of an "artsy" route) and some cute Inspired Ideas projects, and soon you'll have a journal full of creative inspiration!
*This post was not endorsed or promoted by ANY company!* These are just my own thoughts! :) Enjoy your Sunday! S xx

Tuesday 9 August 2011

DIY Scratch Offs!

Hi!
Wow! Two posts in one day! It's a record! It's cause for celebration! (It also means I probably won't post tomorrow! Haha!) Anyway, I found this fab idea, and I just couldn't wait to share it! It is..... (Drum roll Please!)
DIY Scratch Offs!
You know those scratch off lottery tickets? Wouldn't it be cool if you could make them yourself?! Well now you you can, thanks to Martha Stewart (of course!) Art Mind, and Oh the Lovely Things!

I have to admit, I had briefly seen DIY Scratch offs on Pinterest and had thought "Oh you probably need some type of special paint or something, and it's probably tonnes of work and what would I use it for anyway, etc, etc." But now I have seen the error of my ways and realised just how easy and fun and cool it is! (I haven't actually tried it yet, but I'm definitely going to!)

All of the above tutorials use the same method -  2 parts Silver/Metallic Paint & 1 part Washing Up Liquid, painted over whatever you want to find when you scratch it off! The "Oh The Lovely Things" post is the one that actually brought me to my senses, and also has a cute free printable, so you should check that one out, The Art Mind one is the one that everyone on Pinterest went crazy for, and also has a cute idea involving cards, which I will  probably steal, so you should check that one out too. And, of course, there's a Martha version. In fact, she probably started the whole thing, what with her being The Queen of the World Crafts. She uses it for "Save the Dates" for a wedding, but, since I'm thirteen, I'm pretty sure THAT's not going to be happening any time soon. Her tutorial is detailed though, and there are some great tips and help for getting the paint to come off more easily in the comments, make sure you check that out!

I think I'm going to make the "Oh The Lovely Things" ones, then adapt for cards a la Art Mind! Do you think it would work with other colours of paint?  Hmmmm.... I may investigate that! Have fun! S xx

DIY Wreathes!

Hi!
So, a trend that has become suuuper big in the crafting blogosphere is... DIY Wreathes! They. Are. Everywhere. I'm actually a bit late on this one, they've been big a while now, but better late than never, am I right?! There are SOO many versions out there, lots are holiday-themed, but i kinda like the ones you can use at any time better.
So, here we go....
  • Beautiful Braided Wreath from Homework. This is probably the first wreath I ever saw, it's a different take on the classic yarn wreath (click the link for TONNES of versions!) that took the world by storm! What I really love about this wreath is that you don't have to buy a wreath from to make it! With all the other ones, you will, but with Carolyn's version, the yarn braid acts as a wreath, so you just need a ring of card to support it at the back! This makes this wreath super cheap, or FREE if you already have a ball of wool/yarn. Yay!
  • Next up, MADE's Acorn wreath! (Lovvve that blog BTW, check it out!) This wreath has some serious staying power! Just look at all the versions Dana  made! They're not different wreathes, she simply spray-painted it different colours depending on the season! Smart or what? I can't choose which I like best. Maybe the white, since you could use it for all different seasons. Oooohhhh, I love the raspberry pink!

  •  Another pink wreath! But this one is so pretty I couldn't not feature it! She made this for a (very lucky!) little girl's room and it is just gorgeous. I want one for MY room! Check out the tutorial here! *sigh*
  • I really love this >> sweet little wreath (A project from Inspired Ideas!) It's a great way to use up those leftover fabric scraps and cheer up a room! It's so sunshine-y and fun! It also seems quite easy! the hardest part would be trying to decide where to hang it! Wouldn't it look great in a sewing or craft room?! Or even a little girl's bedroom! Go here for the how-to!
  •  There's loads of felt rosette wreathes out there, but this tutorial is really good! Very clear, and lots of pictures! Perfect for someone like me! AND she said she wants to use it year-round as part of her décor, so she used white felt. It's really modern, but fluffy and cute at the same time, which is a good combination in my book. Check it out here!

Now that I've featured some of the more ordinary wreathes,  Here's a bunch that are made from slightly odder materials! You can probably find most of these around your house, but they probably aren't in your craft room!

  • First up, we have a wreath made from... toilet paper rolls! I have to admit, I love these guys! I'm a firm believer that you can do almost anything with them! Along with paint chips, they are one of my favourite materials, because they're both FREE! Anyway, back to the wreath. As I hoard like there's no tomorrow collect toilet paper tubes, yes, collect, you heard me right, I have all the materials needed. If you're a normal person who doesn't like to create what is essentially a massive fire hazard in your bedroom, then you'll have to start stocking up. Or you could root through your re-cycling and pick some out of there. (Just don't let your neighbours see you) Once you've amassed quite a collection, fire up your glue gun and go here for the how-to!
  • If you're planning a kid's birthday party, this is the one for you! It's a wreath made from balloons! (Deflated ones, that is) I think this tutorial uses 144 ballooons, so grab that bag you have lying around and get ready to spend hours attaching ballons to a wrath form. Yes, you'll probably never want to see a balloon ever again by the time you're finished, but your kids will love you for it! Sounds fun to me! <Tutorial>
  • This >> wreath may be made from unorthodox materials, (namely paper cups, the kind you use for parties!) but the results are so modern, sophisticated and stylish that you'd never know! Doesn't it look great?!  And it sounds so easy to make too! Grab a big bag of paper cups and your glue gun and get ready to make! :) Check out the quick how-to here, and while you're there, have a look at the other cool projects she made from the cups, all designed for a fab DIY wedding!
  • And last but DEFINITELY not least, this super-cool cocktail umbrella wreath! I just love this sooo much! It may not be to everyone's tastes,  ;) but it's loud, bright, fun and I just like it! It would be great for a cocktail party or similar get-together or simply because we could all use a little colourful, cocktail umbrella madness on our door, am I right?!
So, there you go. There's a different wreath for everyone! Go now and make one, be it bright, old-fashioned, girly, eco-freindly, texture-y, modern or playful! S xx

    Friday 5 August 2011

    DIY Projects!

    Hello there!
    I realised my blog has been a bit card-heavy these past few days, so I decided to shake it up a bit and post a couple of DIY and craft ideas!

    1) First up, this amazing website/book called P.S. I Made This. (Great name, right?!) I don't have the book, but found the DIY gallery via Pinterest and It. Is. Awesome!  Just check out some of the projects: Home Decor, Fashion, Jewellery....!            
       
    Don't these >> look kinda Dr.Seuss-y and cartoon-y?! they're supposed to be for the 4th of July, but they're so fun I think they'd work at anytime, anywhere! And loooook at that embellished caplet! Absolutely drop-dead gorgeous and NO-SEW! For something slightly more casual,  :) how about << this Pom-Pom purse?! Fun, Pretty and Oh-so-easy! Simply Hot Glue a bunch of Pompoms to your bag and BOOM! There it is! I think I may have to try this one! 
    There's tonnes more over there, so GO CHECK IT OUT! :)

    2) Next up, we have this. Scrapbook paper as Patchwork wallpaper?! Genius! Isn't it so lovely!? I adore this, as it has such a pretty, shabby-chic, Romantic French Cottage feel, but you could easily adapt this idea to use much brighter striped or patterned papers. or how about a cute animal pack for a kid's bedroom?! Oh how adorable that would be!                                                                       

    3) And now, Pillows. Ah pillows, the meaning of life. What you mean, "you don't think so?!" You will do after seeing these bad boys! ;)
    • Now, I'm all for colour, but this >> beautiful, neutral-coloured pillow from "Ruffles and Stuff" stopped me in my tracks! I just think it's so Pretty! Sigh with happiness, and then getcha self over here licketysplit to get the how-to!
    • Next, bold colours reign supreme in this C.C.C. <Colourfully Cute Creation/Cushion!  ;) > I can't find a tutorial for this one, just the picture. But isn't that enough to make you break out your felt and just wing (pun not intended!) it anyway, in the hope of making something at least a little bit like this?! *note* I'm pretty sure I have OCD, as I'd have to make sure all the little birdies were facing the same way on my version, or I wouldn't be able to sleep properly. Yes, I'm weird, I know.
    •  Another bright-coloured pillow here, but it's all one colour. What colour? Orange, of course! I have had a new-found love of orange ever since I started reading How About Orange, Jessica Jone's awesome blog dedicated to said colour. Anyway, here's the pillow. Cool, right? The tutorial is here.  
    *Cue Ad Voice*
    For more pillow ideas (Hand-picked by moi) go here. (My Pillows Pinterest board) While you're there, you can check out my other boards too! There's Printables, Handmade Holidays and Gifts, DIY Wall art, Weathes, and more! Fun for all the Family! Only €0 and 0cents! what a steal! ;)
    Have a great weekend! S xx

      Saturday 30 July 2011

      Card-Making on the Cheap - Bakers twine

      Soooo... I reckon it's about time for another Card-Making on the Cheap post, don't you? ;) Now, I just LOVE this nifty little trick! It may be because...
      a) I am completely BROKE at the moment, and this is FREE for me! (I have the supplies needed on hand already)
      b) It's Suuuuper-Easy! and...
      c) It's really useful!

      "Come on, just tell us what it is already!" I hear you cry. Well... Ta-da! Here it is!   :)

      DIY Bakers Twine! 

      This really is GENIUS, and Baker's Twine looks so fab on cards, this has gotta be one of my most favourite Card-Making tricks ever! :) Go here for the how-to (It's Sooo easy, you could knock out a whole ball of baker's twine in a half-hour - Great project for in front of a movie or your fave TV show!) Have a look at the cards she uses it on, or go here for more uber-cute inspiration! Isn't that "Orange" card fab!? 


      OK,  if you are active in the "blogosphere" in any way, you've probably seen this tut before. It. is. EVERYWHERE! Therefore, I feel I'm cheating a bit because most people probably already knew about it. If you didn't, then great! But if you did, then here's another site I've found:
      It's called The Counterfeit Kit Challenge, and basically, they rip off  those gorgeous, but super-expensive Scrapbooking kits! They're usually made for FREE, as participants use embellishments, papers, and stickers they already own, plus freebie downloads, and tutorials on how to make cute embellishments. Like I said, it's geared towards scrabooking, but the embellishments and printables can easily be altered to use on cards! Visit the tutorial section to pick up some awesome tips on making your own embellishments, while saving yourself a wackload of cash! Have Fun! S xx

      Thursday 28 July 2011

      Perfection!

       Hello!
      Sorry for the lack of posts recently. I've been lazy busy! ;) Anyway, I decided I'd share some cards I made a while ago, not for any particular reason! I found the idea for this >> card on Making Handmade Cards. I liked the idea of using a fabric Yo-yo on a card, and the tutorial for distressing paper (Rub the blade of a scissors along the edge of the paper.) I now use that tip allll the time!

      Then, I was making another card (the bottom one), when I thought, Hmmm, this could really use that Fabric Yo-yo embellishment. I didn't want to make it again, so I ripped it off the first card and used in my new one. Looking at them now,  the yo-yo was a bit small on the first one, a little bit lost, but I'm not 100% sure about the second one either! I guess I'll always be a perfectionist! And don't worry, the now-bare-except for a piece of distressed spotty paper (I took the ribbon off too) got re-used on another card!
      Lesson: Don't be afraid to swap things in, change them around, So what if it's not perfect?!  :)  S xx

      Thursday 21 July 2011

      Inspired Ideas- and a short Rant!

      Hi!
       Beautiful, re-purposed tins. See what I mean?!
      So I'll hope you'll forgive me for being a bit late on this one! I've just found this absolutely gorgeous and totally inspiring online magazine, Inspired Ideas. It. is. Amazing! You can buy the current issue, but before you do that, set aside a few hours (or days!) to go through the archives and past issues. Start with the very first one and keep going up. If you don't have the patience, fine, but I'm telling you, you're missing out!

      The first issues are all quite short, 5 or 6 pages, but they're amazing! (Have I said that already?!) I don't know what I love most - The GORGEOUS craft projects in each issue (The instructions open in new tabs so you can come back to them all later) or even the "blank" pages - no words or writing, just inspirational pictures of ribbons, trims, buttons and general vintage awesomeness, usually colour-coordinated - totally inspiring! Then there's the cute projects in each issue for a "creativity journal." The idea is that you make them all, and then compile them in your journal, which will soon be filled with craft inspiration, so you'll never be stuck for  ideas again! I loved this so much I'm starting my own creativity journal. I'm going to start with their projects and work from there.

       Gorgeous embellished notebooks!
      I think what I love most about it, actually, is the fact that it has literally inspired me to just... create. Not to be afraid of wasting expensive supplies, or messing up, or wasting my time, not worrying about measurements and exact details. To go back to the kind of -for want of a MUCH better word- naive crafts I did years ago, with just some paper, glitter and my hands. Good and all as fancy tutorials and modern crafts are, I think this where I belong. Call me old-fashioned, call me nostalgic, but I love them! Don't get me wrong, I still like modern-day crafts - I sewed an envelope pillowcase for myself just today- but lately I had been feeling kind of creatively depressed. I'd see an idea, think oh, that's cute, but just not have the motivation to actually do it.

      And I think that's what this mag has done. Kick-started me back to thinking up my OWN original ideas, instead of following long tutorials all the time. But the projects featured are faaar from dated! Gold leaf pen anyone?! The ideas are original, beautiful, classic, and encourage you to think creatively, to change them and alter them. Remember, the earth without art is just eh. ;)  S xx  

      Monday 18 July 2011

      I'm Back! (& a card!)

      Hi!
      I'm back!
      I had a great time and bought far too many crafting and card-making supplies (more on that soon enough!)

      Anyway, this is just a quick post to show you this card I made a while ago, but never got round to uploading. Sorry it's sideways, I have no idea how to turn it around! If anyone does know, please leave a comment below! (I'm a complete beginner at all this!) Also, the picture quality is terrible. I'd like to blame my camera, but I'm pretty sure it's me and my <non-existent> photography skills. Oh well, enough complaining, here it is.

      It was a Congratulations card for my aunt who had gotten a new job. I used a kit I have with mini clothes-hangers to make a suit, shoes and handbags (all very business like!) and then used handmade (by me!) paper flowers and a cute bumble-bee sticker to brighten it up. (Are you getting a pain in your neck from staring at it yet?!)  The greeting I made online, using this super-cool website called Spell with Flikr. It does what it says on the (metaphorical) tin, and you can spell anything you want and then print it off for.... <catchphrase-alert!> FREE! Yay!  :)  That's all folks,  Hope you liked my card!  S xx

      Friday 1 July 2011

      Back Soon!

      Hi there!
      I just popped in to say I'm going away :), so there won't be any posts for a while. If you're looking for craft or DIY projects, free printables, kid's crafts or decorating ideas while I'm gone, check out my Pinterest boards! There should be enough there to keep you going, and normal posting should resume in about 2 weeks! :) See you then! S xx

      *Cue pictures of awesome things you are mising out on unless you check out my Pinterest*